Wednesday, 8 May 2013

Heat energy from alcohols


Heat energy from alcohols
Class practical
This experiment compares the amounts of heat energy produced by burning various alcohols.
 
Lesson organisation
This experiment is suitable for pre-16 students, possibly as an introduction to a topic on fuels. It can be taken further if used with post-16 students who can calculate values for enthalpy changes of combustion, with subsequent discussion about heat losses and incomplete combustion.
The alcohols should be provided in labelled spirit burners ready to use. If each group investigates one alcohol, the experiment can be done in around 20 mins. It is better if each spirit burner is used by more than one group of students. Variation of results will add substance to a discussion about errors.
Chemicals
Methanol (HIGHLY FLAMMABLE, TOXIC)
Ethanol (HIGHLY FLAMMABLE)
Propan-1-ol (HIGHLY FLAMMABLE, IRRITANT)
Propan-2-ol (HIGHLY FLAMMABLE, IRRITANT)
Butan-1-ol (FLAMMABLE, IRRITANT, HARMFUL)
Apparatus
Eye protection
Each group of students requires:
Retort stand and clamp
Conical flask (150 cm3 or larger)
Measuring cylinder (100 cm3)
Thermometer (-10 °C to +110 °C)
Access to balances, preferably several, to avoid queuing.
Groups require access to spirit burners
(Note 1), with wicks and caps, containing the alcohols listed.
Health & Safety and Technical notes
Methanol, CH3OH(l), (HIGHLY FLAMMABLE, TOXIC) - see CLEAPSS Hazcard. Methanol is volatile and has a low flash point.
Ethanol, CH3CH2OH(l), (HIGHLY FLAMMABLE) - see CLEAPSS Hazcard. Ethanol is volatile and has a low flash point.
Propan-1-ol, CH3CH2CH2OH(l), (HIGHLY FLAMMABLE, IRRITANT, HARMFUL) - see CLEAPSS Hazcard.
Propan-1-ol is volatile and has a low flash point.
Propan-2-ol, CH3CHOHCH3(l), (HIGHLY FLAMMABLE, IRRITANT, HARMFUL) - see CLEAPSS Hazcard.
Propan-2-ol is volatile and has a low flash point.
Butan-1-ol, CH3CH2CH2CH2OH(l), (HARMFUL)  - see CLEAPSS Hazcard.  Butan-1-ol is volatile and has a low flash point.

1 Suitable spirit burners are hard to come by. Ideally they should be small, with a capacity of 50 cm3 or less. Pictures and information in suppliers' catalogues can be misleading. If capacity is more than 50 cm3, reduce it, for instance by packing with mineral wool, or partially filling with epoxy. Refer to CLEASPSS L195 Safer chemicals, safer reactions. One possible source is
A.J.Cope, 11/12 The Oval, Hackney Road, London, E2 9DU
Tel: 0207 729 2405 Fax: 0207 729 2657

Procedure
a Measure 100 cm3 of cold tap water into a conical flask.
b Clamp the flask at a suitable height so that a spirit burner can easily be placed below.
c Weigh the spirit burner (and cap) containing the alcohol and record this mass and the name of the alcohol.
d Record the initial temperature of the water in the flask.
e Place the spirit burner under the flask and light the wick.
f Allow the alcohol to heat the water so the temperature rises by about 40 oC.
g Replace the cap to extinguish the flame.
h Re-weigh the spirit burner and cap, and record this mass.
i Work out the mass of alcohol used.
j Using a fresh 100 cm3 of cold tap water, repeat the experiment with another alcohol.

Teaching notes
Get the class to record and share the results. Do not be surprised if groups get different answers for a given alcohol. Heat losses will almost certainly vary considerably.
Subsequent discussion depends on the level of the students’ experience.
Student questions
Here are some possible questions to ask students.
  1. Which alcohol produces the most energy per gram?
  2. Which alcohol produces the most energy per mole?
  3. Write equations for the complete combustion of each alcohol.
  4. Propan-1-ol and propan-2-ol are isomers (same molecular formula, different structures) Do they produce the same amount of heat on combustion?
  5. Does all the heat produced by combustion go into raising the temperature of the water?
  6. Is it possible that combustion may be incomplete, giving carbon monoxide amongst the products? (Stress the dangers of this.)
  7. Alcohols can be used as a substitute for hydrocarbon fuels, and so methods of producing alcohols are very important. What process converts sugar into alcohol - and carbon dioxide?

Exploding balloons


Exploding balloons
Demonstration
In this demonstration experiment, mixtures of hydrogen and oxygen gases in party balloons are ignited. Varying the proportions of the two gases alters the vigour of the resulting explosive, exothermic reaction.
 
Lesson organisation
This is a noisy demonstration and should be done in a large room so that the audience can sit or stand well away from the exploding balloons.
Chemicals
Access to cylinders (with regulators and rubber delivery tubing) of hydrogen (EXTREMELY FLAMMABLE) and oxygen gas (OXIDISING)
Apparatus
The teacher will require:
Eye protection
Ear protectors
Small balloons, at least 4 (Note 1)
Metre rule
Small candle or wax taper (Note 2)
Cotton thread
Boss, clamp and stand
Matches
Students will require:
Eye protection
Health & Safety and Technical notes
Wear eye protection throughout. The teacher should also wear ear protection as indicated. Students should be instructed to protect their ears at relevant points in the demonstration.  
Hydrogen, H2(g), (EXTREMELY FLAMMABLE) - see CLEAPSS Hazcard. Hydrogen gas generated chemically will not have sufficient pressure to inflate the balloons.
Oxygen, O2(g), (OXIDISING) - see CLEAPSS Hazcard. Oxygen gas generated chemically will not have sufficient pressure to inflate the balloons.
1 Small party balloons are ideal. Do not fill the balloons too far in advance of the lesson. Filling the balloons with the different mixtures of gases can be tricky and teachers may prefer to have some balloons which are already filled.
2 Attach the candle or wax taper to the end of the metre rule with adhesive tape or Blu-Tak.
Procedure
a Inflate one of the balloons with air (by mouth) and seal it by tying a knot in the neck. Clamp the knotted end of the balloon to hold it in position. Place the clamp stand on a desk well away from any combustible materials. Check that the ceiling space above the clamp stand is also clear.
b Light the candle or wax taper and touch the balloon with the candle flame. The balloon will burst with a familiar pop, due solely to the rubber bursting. Extinguish the candle flame.
c Inflate a second balloon with hydrogen from a cylinder and seal it. This balloon should float in air. Tether it to the clamp stand with a length of cotton thread. Ensure that the students are at least 3 m away.
d Instruct the students to place their fingers in their ears. The teacher should wear ear protection.
e Light the candle and, holding the metre rule at arm’s length, touch the candle flame on the balloon. The balloon will explode with a loud bang. Flames from the combustion of the hydrogen with the oxygen in the air can be seen. Extinguish the flame.
f Inflate the third balloon with a little hydrogen (about one third of the full balloon size) and complete the inflation with air from the mouth. The correct ratio of hydrogen to air for complete combustion is 2:5 but it is preferable to have rather more hydrogen than this so that the balloon will float upwards.
g Attach the filled balloon to the clamp stand with a cotton thread as before. Ensure that ears are protected and then ignite the balloon as before. The explosion will be louder this time because the fuel (hydrogen) and the oxygen in the air are thoroughly mixed. Again, extinguish the candle flame.
h Finally, inflate the fourth balloon - first with some hydrogen and then fill it with oxygen from the cylinder. The ideal mixture is two volumes of hydrogen to one volume of oxygen but this may need adjusting in order to ensure that the balloon still floats.
i Attach the balloon to the clamp stand with thread as before. Wear ear protectors and ensure that members of the audience place their fingers in their ears. Ignite the balloon at arm’s length. There will be a very loud explosion!

Teaching notes
Hydrogen-air mixtures will explode if they contain between 4 to 75% hydrogen.
The exothermic reaction:
2H2(g) + O2(g) → 2H2O(g)
releases 484 kJ of energy from the amounts (reacting masses) shown in the equation.
A good way of presenting the demonstration is to have the balloons tethered in a row some distance apart, prepared shortly before the demonstration. They can then be ignited one-by-one in order of increasing vigour of reaction.
The explosions increase in loudness as the percentage of oxygen in the mixture increases. The class could be asked to predict what would happen if a balloon filled only with oxygen is ‘ignited’. This could then be demonstrated, with suitable theatricality, and the class asked to explain the rather disappointing result. With no fuel (hydrogen) for the oxygen to combine with, the bang is due only to the bursting of the rubber of the balloon, as when filled only with air (or helium).

Experiments with hydrogels - plant water storage crystals


Experiments with hydrogels - plant water storage crystals
Class practical
In this activity students investigate plant water storage crystals, a product that contains hydrogels – polymeric smart materials. The practical work is fun to do, and the results are clear and easy to see.
 
Lesson organisation
To complete all parts of this experiment takes over an hour. If lessons are shorter than that then part 1 can be done in a prior lesson. The crystals keep for a few days if they are covered in water.
During the time that the crystals have to be left, other Experiments with hydrogels, using hair gel and disposable nappies, could be carried out. 
It is a good idea to ask students to make detailed observations of each part of the experiment.
The water crystals can be coloured with a few drops of food colouring (for wonderful, lurid colours), with strong tea solution (which stains some containers but provides a useful model of a drug delivery system – see teaching notes) or not at all (which seems a bit of a shame as they look great when coloured.)
Chemicals
Each working group requires:
Water crystals, about 100 cm3
Either strong tea, 500 cm3, or a few drops of food colouring (optional) 
Sodium chloride (table salt) solution, very concentrated or saturated, 200 cm3
Distilled water, 400 cm3
Sugar, 1 spoonful
Apparatus
Eye protection
Each working group requires:
Large ice cream tub or similar container (at least 1 dm3)
Beakers (250 cm3), 3
Dessert spoon or similar measure
White paper - to place under beakers to see what is happening more easily
Stirring rods, 3
Petri dishes – lids not required, 2
Access to:
Sieve (the plastic ones used for sifting flour are fine) or large funnel and either paper towels or filter paper
Tea strainer (only required if a funnel is used earlier, otherwise the sieve can be used again)
Health and Safety and Technical
Water crystals - Water crystals are available from garden centres and are sold under various names including Phostrogen Swellgel. Each group needs about a teaspoonful.
Strong tea - For the strong tea use two tea bags per litre, pour on boiling water and leave to brew overnight. This tea stains some containers.
Distilled water - If distilled water is not available, tap water can be used but the results are not as spectacular.

Procedure
Part 1
a Estimate the volume of one teaspoonful of the water crystals.
b Put about 500 cm3 of tea, tap water or water coloured with a few drops of food colouring into the beaker or tub. Add one teaspoonful of water crystals, stir gently and leave on one side for at least half an hour, or overnight.
Part 2
a Sieve the water crystal mixture. It is best to do this over a large tub rather than the sink in case you drop it. Wash the gel crystals carefully once or twice in water to remove any excess tea or food colouring if you used it. Estimate the new volume of your crystals.
b Stand the three 250 cm3 beakers on a piece of white paper.
c Put two dessert spoons of the gel crystals into each beaker, estimate their volume and then add about 200 cm3 of salt solution to one and 200 cm3 of distilled water to each of the others. Add a spoonful of sugar to one of the beakers with water in it. Label the beakers.
d Stir the mixtures gently – using a separate stirring rod for each one so that the solutions do not become cross-contaminated. Leave for 10–15 mins, stirring occasionally.
e If you used tea, pour some of the solution from each beaker into a petri dish placed on the white paper. Use a tea strainer or sieve to prevent any crystals getting onto the petri dish. Note carefully the colour of each liquid.
f Sieve the remaining mixtures, discarding the excess liquid and returning the crystals to the beakers. Estimate their new volumes.

Teaching notes
This activity can be used to enhance the teaching of ionic and covalent bonding, or hydrogels can be considered as an interesting polymer as well as an example of a smart material. Hydrogels are smart materials because they change shape when there is a change in their environment – in this case it is the change in the concentration of ions.
Students need to have some knowledge and understanding of ionic and covalent bonding, reversible reactions, and acids and bases to understand what is happening.
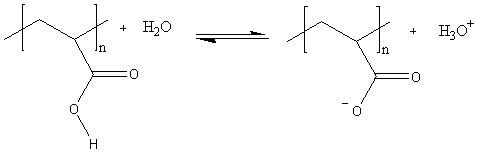
Hydrogels are polymers that can retain many times their own weight in water. They are often polymers of carboxylic acids that ionise in water, leaving the polymer with several negative charges down its length. This has two effects. First, the negative charges repel each other and the polymer is forced to expand. Secondly, polar water molecules are attracted to the negative charges. This increases the viscosity of the resulting mixture still further as the polymer chain now takes up more space and resists the flow of the solvent molecules around it.

The polymer is in equilibrium with the water around it, but that equilibrium can be disturbed in a number of ways. If the the ionic concentration of the solution is increased – eg by adding salt – the positive ions attach themselves to the negative sites on the polymer, effectively neutralising the charges. This causes the polymer to collapse in on itself again. Adding alkali removes the acid ions and moves the equilibrium to the right; adding acid has the opposite effect.
There are a large number of hydrogels and they are sensitive to different pHs, temperatures and ionic concentrations. By using a mix of monomers to create the polymer these characteristics can be fine-tuned.
The hydrogels that are commonly available and are used in this practical activity are sensitive to salt concentration, but do not show much change across the pH range that can be readily investigated in the classroom. However, they do lend themselves very well to a range of investigative practical work. For example, their volume in different amounts of water or in different salt concentrations can be measured. For this type of investigation it is best to use either plant water crystals or to order sodium polyacrylate from Sigma Aldrich – this has a smaller crystal size and gives faster results.
Students should make detailed notes on their experiments, noting changes in volume, colour and any other observations. Some expected observations could include:
The crystals swell up from about 5 cm3 to about 500–600 cm3. They take on the colour of the tea (or food colouring), showing that the tea has also been absorbed.
When distilled water is added to the hydrated crystals, they swell up further. The tea remains absorbed in the crystals and the water does not change colour. When salt water is added to the hydrated crystals, they begin to shrink and the water changes colour as the tea is released. It is possible to measure the aproximate size of individual pieces of the hydrogel too, and to show that the pieces have swollen or shrunk. The hydrated crystals in the sugar solution have the same volume as the ones in the distilled water. If they are left for up to 15 mins the tea is not released. (After this time, the water in the hydrated crystals is in equilibrium with the water in the beaker and some tea may begin to be observed.)
These observations show that the hydrogel responds to changes in the ionic concentration of the solution – the salt, which is ionic, causes the hydrogel to collapse but the covalent sugar does not.
Research is currently being done to see if it is possible to use hydrogels and similar materials as a drug delivery system – a way to get drugs and medicines to where they are required in the body. The experiment with tea and the hydrogel is a model of this type of drug delivery system. The drug is first loaded onto the carrier and then it is released at the right location. The tea represents the drug and the hydrogel is the carrier.

Determination of Relative Atomic Mass


Determination of Relative Atomic Mass
Class practical
In this experiment magnesium ribbon reacts with dilute hydrochloric acid to produce hydrogen gas, which is collected in a burette. The measured volume of gas produced and mass of magnesium are used to calculate the mass of magnesium that would be needed to produce one mole of hydrogen molecules, and hence deduce the relative atomic mass of magnesium.
 
Lesson organisation
This is a class experiment suitable for students who already have a reasonable understanding of the mole concept, and are at least beginning to use chemical equations to perform calculations.
Timing will depend on the adequacy of access to top-pan balances, and the skill with which students can use the balance to sufficient accuracy. Including the time taken by the teacher to demonstrate the procedure, and allowing an average of 5 minutes for each student to weigh their magnesium ribbon, a total of 45 minutes should be adequate for the class to obtain and record their results.
Chemicals
Hydrochloric acid, 2 M, (IRRITANT), 25 cm3
Magnesium ribbon, approx 3 - 4 cm length
Apparatus
Eye protection
The teacher and each working group will require:
Fine emery paper, a few cm2
Burette (50 cm3) (Note 1)
Burette stand
Funnel, small
Beaker (100 cm3)
Beaker (250 cm3)
Access to:
Top-pan balance, accurate to +/- 0.001 g
(Note 2)
Room temperature and pressure measurements (Note 3)
Health & Safety and Technical notes
Dilute hydrochloric acid, HCl(aq), (IRRITANT at concentration used) - see CLEAPSS Hazcard and CLEAPSS Recipe Book. Provide the hydrochloric acid in small bottles or corked conical flasks, labelled, suitable for pouring the acid into the burette.
Magnesium ribbon, Mg(s) - see CLEAPSS Hazcard. Clean the magnesium ribbon with emery paper to remove the grey oxide layer, so that it appears shiny and metallic. Cut the ribbon into lengths of 3 - 4 cm. (which will yield around 30 cm3 of hydrogen when reacted). Do NOT leave in a place where pupils would have potentially unsupervised access.
1 Ensure the burette taps are free from leakage, operate smoothly and are secure in their sockets. Refer to CLEAPSS Laboratory Handbook Section 10.10.1.
2 If a balance weighing to 0.001 g is not available, reasonable results could be obtained by weighing a much longer (eg 30 cm) piece of magnesium ribbon beforehand on a balance weighing to 0.01 g, measuring its length and then cutting it accurately into 3 cm lengths. Using the mass and length of the long piece of magnesium, the average mass of a 3 cm length can be calculated with sufficient accuracy.
5 If a barometer is not available in the laboratory, an up-to-date reading of atmospheric pressure will need to be obtained shortly before the lesson, eg from a local weather website. Similarly a measurement of room temperature is needed.

Procedure
a Weigh accurately, to the nearest 0.001 g, a length of magnesium ribbon, approx 3 – 4 cm long. The mass should lie between 0.020 and 0.040 g.
b Ensure the burette tap is closed. Use a small funnel to pour 25 cm3 of dilute hydrochloric acid into the burette, followed carefully by 25 cm3 of water. Try to avoid mixing of the two liquids as far as possible. Accurate volume measurements are not needed. This should leave a space of at least 5 cm between the liquid and the top of the burette.
c Carefully push the magnesium ribbon into the open end of the burette, pushing the strip in the middle so that the springiness of the strip holds it in place against the glass. Do not allow it to contact the liquid at this stage.
d Add about 50 cm3 of water to a 250 cm3 beaker.
e Rest the top of the burette gently on the lip of the beaker, then quickly turn the burette upside-down and lower the end beneath the water in the beaker. If this is done quickly and carefully (the teacher may wish to demonstrate this first), little or no liquid will be lost. Clamp the burette vertically in this upside-down position.

f Without delay, check that the liquid level in the burette is on the scale – if it is not, open the tap momentarily to allow the level to drop on to the scale.
g Take the burette reading of the liquid level (Note: the scale is also now upside-down!)
h As the acid diffuses downwards, the magnesium begins to react. Allow the metal to react completely.
i Once the liquid level has ceased to change, and no more gas bubbles are being formed, take the final burette reading, and record the result.

Teaching notes
It is advisable to demonstrate the procedure beforehand. The inversion is not difficult, and it is not necessary to put a finger over the open end. Students need to be warned not to fold the magnesium ribbon, but to push it into the burette so that it is retained under its own tension.
A balance reading to only +/- 0.01 g does not have sufficient accuracy for the procedure used in this experiment, where the maximum possible volume of hydrogen that can be collected is only 0.002 mol, which would be produced by 0.048 g of magnesium.
The teacher may wish to collect results from the class on a spreadsheet to enable a discussion about their reliability.
The resulting calculation can be performed at various levels. The class do need to be able to understand the equation:
Mg + 2HCl → MgCl2 + H2
and be able to use it to recognise that 1 mole of magnesium will yield 1 mole of hydrogen molecules. From the results, the least required of students would be to perform a proportionality calculation to determine the mass of magnesium that would have yielded 24 000 cm3 of hydrogen.
More able students, with an understanding of the ideal gas equation, should be asked to convert the volume of gas collected under known conditions in the experiment to standard temperature and pressure, and then determine the mass of magnesium that would have yielded 24 000 cm3 of hydrogen.

Dehydration of ethanol to form ethene


Dehydration of ethanol to form ethene
Demonstration and Class practical
Ethanol vapour is dehydrated by passing over a heated catalyst to produce ethene gas. This is collected over water and tested for typical properties of an unsaturated hydrocarbon.
 
Lesson organisation
The experiment can be performed as a demonstration or as a class experiment according to circumstances. The main risk to be considered in making the choice is the reliability of the students involved handling very hot glassware and manipulating the apparatus for safe gas collection over water, while avoiding suck-back of cold water into the hot tube.
A demonstration will take about 10 - 15 minutes, with a few more minutes for testing the gases. A class experiment takes longer, probably about 30 - 40 minutes.
Chemicals
Ethanol (IDA, Industrial Denatured Alcohol) (HIGHLY FLAMMABLE, HARMFUL), 2 - 3 cm3 (provided in small bottles)
Mineral wool, sufficient for a loosely-packed wad to absorb the liquid at the bottom of the test-tube
Pumice stone or porous pot (unglazed), a supply of small fragments - about pea-sized
Bromine water, 0.02 M (HARMFUL), about 5 cm3 - diluted to pale orange-brown
Acidified potassium manganate(VII) (potassium permanganate) solution, about 0.01 M, about
5 cm3 (Note 4)
Apparatus
The teacher and/or each working group will require:
Eye protection
Safety screens (for demonstration)
Boiling tube (Note 1)
Rubber bung, 1 hole – to fit boiling tube
Delivery tube (see diagram)
Bunsen valve (Note 2)
Test-tubes, 6
Corks or bungs, to fit test tubes, 6
Dropping pipette
Bunsen burner
Heat resistant mat
Test-tube rack
Glass or plastic trough, small (Note 3)
Wooden splint
Retort stand, boss and clamp 
Health & Safety and Technical notes
Ethanol (IDA, Industrial Denatured Alcohol) (HGIHLY FLAMMABLE, HARMFUL) - see CLEAPSS Hazcard.
Bromine water (HARMFUL) - see CLEAPSS Hazcard
Potassium manganate(VII) (potassium permanganate) solution, about 0.01 M  - see CLEAPSS Hazcard and CLEAPSS Recipe Book.
Dilute sulfuric acid, 0.1 M - see CLEAPSS Hazcard and CLEAPSS Recipe Book.
The assembled apparatus needs to look like this:m

1 A large, 150 x 25 mm, hard glass (borosilicate) test-tube.
2 The purpose of the Bunsen valve (see diagram below) is to prevent suck-back of water into the hot tube when heating is stopped and the gas inside the apparatus contracts on cooling. The Bunsen valve is constructed from a short length (about 3 cm) of clean, unused, soft rubber tubing, with one end stoppered with a short length of glass rod. A 1 cm long slit is carefully cut into the middle of the rubber tubing with a scalpel. The resulting assembly is fitted onto the lower end of the delivery tube. Note that the effectiveness of the home-made valve is variable, and for class use a supply of spares should be provided.
3 The trough needs to be small enough to match the scale of gas collection – the large traditional trough which used to be used with gas jars is not appropriate. For demonstration or class use square, clear, plastic sandwich boxes make excellent troughs.

4 The potassium manganate(VII) solution is made by dissolving solid potassium manganate(VII) in 0.1 mM sulfuric acid. 1 dm3 of stock solution is made by dissolving 1.6 g of potassium manganate(VII) crystals in 1 dm3 of 0.1 M sulfuric acid.
For a demonstration, the class and teacher should be protected by safety screens in case of unexpected suck-back causing the hot tube to shatter on a demonstration bench.

Procedure
Assemble the apparatus within easy reach of a Bunsen flame.
a Half fill the trough with water and fill the test-tubes with water, leaving them submerged in the trough. Bungs for the test-tubes can be placed upside-down in the trough, so that the tubes filled with gas can just be pressed onto them before they are removed to a rack.
b Place a wad of mineral wool in the bottom of the boiling tube so that it fills the bottom to a depth of about 1 cm without packing too firmly. Using a dropping pipette, carefully drop about 2 cm3 of ethanol into the mineral wool so that it soaks in. It should be possible to invert the tube without any significant amount of liquid draining out.
c Clamp the boiling tube at the neck end so that the mouth is tilted slightly upwards. Fill most of the tube with pieces of pumice stone or broken porous pot. This will ensure maximum contact time between the ethanol vapour and the hot catalyst. Fit the delivery tube so that it dips into the water in the trough. Fit a Bunsen valve, if desired.
d Heat the pumice stone or porous pot strongly with the tip of medium Bunsen flame for several seconds until thoroughly hot. Avoid heating the tube too close to the rubber stopper. Then flick the flame quickly onto the mineral wool for a few seconds to vaporise some of the ethanol. Then return the flame to the catalyst.
e When a steady stream of gas bubbles is established, collect four to six tubes full of gas by holding them over the Bunsen valve. It is better to have an assistant to manipulate the gas collection tubes, changing and sealing them as they are filled. Take care not to lift the water-filled tubes out of the water when moving them, to avoid letting air into them. Seal the full tubes by pressing them down on the bungs, then place them in a rack.
f Continue with the Bunsen burner heating the mineral wool for about one second out of every ten and the pumice stone for the other nine. To avoid the risk of suck-back, do not remove the Bunsen burner flame from the heated tube while the gas is being collected. If suck-back becomes unavoidable, quickly remove the delivery tube from the water by lifting the whole apparatus using the clamp stand.
g When six tubes of gas have been collected, or gas production ceases, remove the delivery tube from the water by lifting the clamp stand, and then stop heating. Keep the Bunsen flame away from the end of the delivery tube.
h Test the tubes of collected gas as follows:
  • Pass the first two tubes (mainly air anyway) round the class so that the students can cautiously smell the gas.
  • Uncork the last tube collected, and hold a lighted spill in its mouth to ignite the gas. It will burn with a yellow flame.
  • To another test-tube of gas, add about 1 cm depth of bromine water. Re-seal it and shake well. If the pale orange bromine water is decolourised, the gas contains an unsaturated hydrocarbon.
  • Add about 1 cm depth of acidified potassium manganate(VII) solution to another test-tube of gas. Re-seal and shake well. If the purple solution is decolorised, possibly leaving a brown coloration of manganese dioxide, the gas contains an unsaturated hydrocarbon.
The results of the last two tests are characteristic of unsaturated hydrocarbons, whose molecules contain carbon-carbon double bonds.

Teaching notes
This experiment would form part of the teaching and learning sequence for the chemistry of hydrocarbons and alcohols. The teacher will need to decide:
  • how much the students should know about hydrocarbons before this lesson
  • if they are familiar with hydrocarbons, whether they should be familiar with the potassium manganate(VII) and bromine water tests for a carbon-carbon double bond before the lesson, or should be introduced to these tests by means of this experiment.
For the dehydration of ethanol, the only likely product is ethene. Ball and stick molecular models will be useful for modelling both the dehydration and the tests. 
The ethanol dehydration is represented by:
CH3CH2 → CH OH(g)2=CH2(g) + H2O(g)
The experiment can be linked to the industrial applications of such reactions; see the web-links below.
Bromine in non-aqueous solution adds across the double bond of an alkene, to give for example 1,2-dibromoethane, CH2Br–CH2Br (a suspected carcinogen). However, in aqueous solution the main product is a bromoalkanol, such as 2-bromoethanol, CH2Br–CH2OH .
Acidified manganate(VII) cleaves C=C double bonds to form two carbonyl compounds (ketones and aldehydes), while alkaline permanganate produces a diol such as ethan-1,2-diol, CH2OH–CH2OH.
Note that in industry the term ‘dehydration of ethanol’ refers to the removal of water from ethanol solutions produced by fermentation, not to the reaction investigated here. Industrially some ethanol is made by the reverse reaction, the addition of water to ethene. However, a really important dehydration of an alcohol is the dehydration of 1-phenylethanol to produce phenylethene, better known as styrene, the monomer for polystyrene.